Blogger Theme Change कैसे करें | Blogspot में कस्टम टेम्पलेट कैसे लगाएं

Blogger Theme Change कैसे करें | Blogspot में कस्टम टेम्पलेट कैसे लगाएं
ब्लॉग बनाने और मैनेज करने के लिए ब्लॉगर एक लोकप्रिय मंच है। ब्लॉगर की महान विशेषताओं में से एक आपके ब्लॉग की थीम को बदलने की क्षमता है, जिससे आप इसे एक ताज़ा और personalized रूप दे सकते हैं। इस पोस्ट में, हम आपको अपने ब्लॉगर ब्लॉग की थीम को बदलने के बारे में एक विस्तृत गाइड प्रदान करेंगे।
अगर आप जल्दी में हैं तो यहाँ समझें की Blogger.com में टेम्पलेट कैसे बदलते हैं। आगे हमने पुराने थीम के बैकअप लेने उसको डाउनलोड करने और नए थीम को अपलोड करने के बारे में विस्तार से बताया है।
Blogspot/Blogger Theme Change कैसे करें
Blogspot/Blogger Theme Change करना बहुत आसान है। आप Blogger के Dashboard से आसानी से अपनी Theme बदल सकते हैं।
Blogger Theme Change करने के लिए निम्नलिखित Steps Follow करें:
अपने Blogger थीम को बदलने के लिए, इन सरल चरणों का पालन करें:
1. अपने Blogger खाते में साइन इन करें:
- सबसे पहले, Blogger वेबसाइट (www.blogger.com) पर जाएं।
- अपने Google खाते का उपयोग करके अपने Blogger खाते में साइन इन करें।
- यदि आपके पास Blogger खाता नहीं है, तो आप “Create Your Blog” बटन पर क्लिक करके एक बना सकते हैं।
2. थीम मेनू तक पहुंचें:
- साइन इन करने के बाद, आपको Blogger डैशबोर्ड पर ले जाया जाएगा।
- बाईं ओर, आपको एक मेनू मिलेगा।
- थीम सेटिंग्स तक पहुंचने के लिए, “थीम” विकल्प पर क्लिक करें।
3. उपलब्ध थीम देखें:
- थीम सेटिंग्स में, आपको अपने ब्लॉग की वर्तमान थीम दिखाई देगी।
- इसे बदलने के लिए, स्क्रीन के ऊपरी दाएं कोने में स्थित “Customize” बटन पर क्लिक करें।
- यह आपको थीम अनुकूलन विकल्पों पर ले जाएगा।
- Blogger मुफ्त थीम की एक विस्तृत श्रृंखला प्रदान करता है।
- उपलब्ध थीम देखने के लिए, अनुकूलन पैनल के शीर्ष पर स्थित “Browse” बटन पर क्लिक करें।
4. एक थीम चुनें:
- एक बार जब आपको कोई थीम पसंद आ जाए, तो उसे चुनने के लिए उस पर क्लिक करें।
- आप “Customize” बटन पर क्लिक करके चयनित थीम को और भी अनुकूलित कर सकते हैं।
- यह आपको थीम के विभिन्न पहलुओं को बदलने देगा, जैसे लेआउट, रंग और फ़ॉन्ट।
5. थीम को कस्टमाइज करें:
- थीम को अनुकूलित करते समय, आपको स्क्रीन के बाईं ओर कई विकल्प दिखाई देंगे।
- ये विकल्प आपके द्वारा चुनी गई थीम के आधार पर भिन्न हो सकते हैं।
- कुछ सामान्य अनुकूलन विकल्पों में शामिल हैं: लेआउट, रंग, फ़ॉन्ट और उन्नत।
6. Previewऔर प्रकाशित करें:
- अपनी थीम को अनुकूलित करने के बाद, यह देखने के लिए कि आपके ब्लॉग में विज़िटर कैसा दिखेगा, इसका पूर्वावलोकन करना एक अच्छा विचार है।
- ऐसा करने के लिए, अनुकूलन पैनल के शीर्ष पर स्थित “Preview” बटन पर क्लिक करें।
- यदि आप परिवर्तनों से संतुष्ट हैं, तो अपनी ब्लॉग पर नई थीम को लाइव करने के लिए “Apply to Blog” बटन पर क्लिक करें।
Custom Theme Upload करने के लिए:
- सबसे पहले अपने Blogger Dashboard में जाएं।
- Themes पर क्लिक करें।
- Customize पर क्लिक करें।
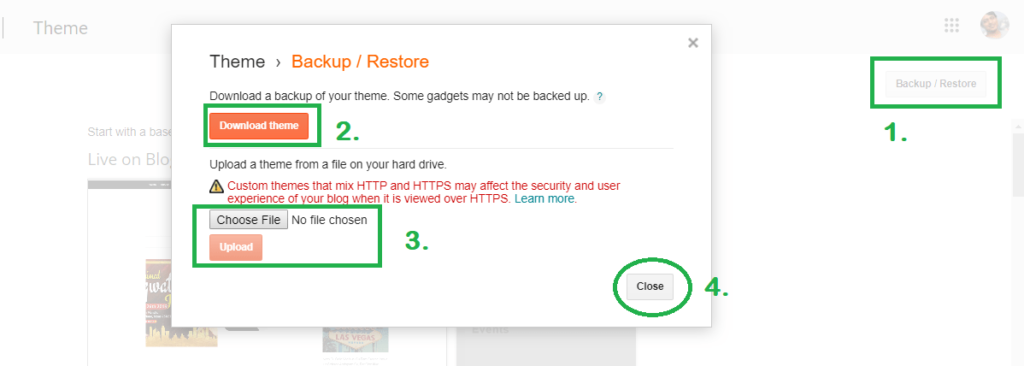
- Restore पर क्लिक करें।
- Choose File पर क्लिक करें।
- अपनी Custom Theme को Select करें।
- Open पर क्लिक करें।
- Upload पर क्लिक करें।
इतना करते ही आपकी Custom Theme Blogger में Upload हो जाएगी।
Blogger Theme Change के दौरान ध्यान रखने योग्य बातें:
- जब आप अपनी Theme Change करते हैं, तो आपकी Blog पोस्ट, Pages, और Comments में कोई बदलाव नहीं होता है।
- आप अपनी Theme को किसी भी समय Change कर सकते हैं।
- अगर आप अपनी Theme Change करने के बाद से खुश नहीं हैं, तो आप हमेशा अपनी पुरानी Theme को Restore कर सकते हैं।
ब्लॉगर पर Custom Template कैसे अपलोड करें?
Blogger theme upload karne ke liye neeche diye gaye steps ko follow karein:
Step 1: Blogger Account me Login Karein
Sabse pehle, apne Blogger account me login karein. Blogger ke dashboard me pahuchne ke liye www.blogger.com par jayein aur Google credentials ka upyog karke login karein.
Step 2: Theme Settings me Jayein

Blogger dashboard me aane ke baad, left-hand side me “Theme” option par click karein. Isse aap theme settings me pahuch jayenge.
Step 3: Backup/Restore Option par Click Karein
Theme settings me pahuchne ke baad, customization panel ke upar right corner me “Backup/Restore” option hoga. Uspar click karein. Ek pop-up window open hogi.
Step 4: Theme Download karein (Optional)
Yadi aap apne previous theme ka backup lena chahte hain, to sabse pehle “Download Theme” ka option choose karein. Isse aap apne purane theme ka backup download kar sakte hain. Isse aapke paas puri theme ka backup available rahega.
Step 5: New Theme Upload Karein
Ab “Choose File” ya “Select File” button par click karein, jo pop-up window me dikh raha hoga. Apne system me se XML format me saved theme file ko choose karein.
Step 6: Theme Upload Confirm Karein
XML file select karne ke baad, “Open” button par click karein. Isse aapne selected XML theme file ko choose kar liya hoga.
Step 7: Theme Upload Complete Karein
XML file choose karne ke baad, pop-up window me “Upload” button par click karein. Blogger aapke XML theme file ko upload karega. Theme upload hone me kuch samay lag sakta hai, isliye thoda wait karein.
Step 8: Theme Preview Karein
Jab theme upload complete ho jaye, aapko ek preview dikhayi degi. Aap apne blog ka preview dekhkar theme ke appearance ko check kar sakte hain. Yadi aap satisfied hai, to “Apply to Blog” ya “Save” button par click karein.
Step 9: Changes Save Karein
“Apply to Blog” ya “Save” button par click karne ke baad, aapke Blogger blog par new theme apply ho jayegi. Aapke blog ka appearance aur design update ho jayega. Aap customization panel me jaakar further changes kar sakte hain, jaise ki colors, fonts, layout, aur other settings modify karne ke liye.
Blogger Templates Download Kaise Karein?
Step 1: Aap Online templates download kar sakte hain.
Aap kai aisi webite hain jo free blogger Template provide karti hain. Yah website free aur premium dono templates offer karti hai.
| Gooyaabi Templates | https://gooyaabitemplates.com |
| Templateify | https://www.templateify.com/ |
| Btemplates | https://btemplates.com/ |
| Piki Templates | https://www.pikitemplates.com/ |
Step 2: Apni blog category choose karein.
Jab aap website par jaate hain, to aapko “Categories” section dikhne ko milega. Apni blog category choose karein.
Step 3: Ek template select karein.
Aap apne blog category ke hisaab se templates explore kar sakte hain. Har template ke saath live preview bhi available hoti hai.
Step 4: Template download karein.
Template select karne ke baad, download button par click karein. Template download hone ke baad, aapke system me ek zip folder ki form me download ho jayega.
Step 5: Zip folder ko extract karein.
Zip folder ko apne system se extract kar lein. Aapko extract karne ke baad kai files milenge, lekin aapko sirf XML extension wale file ko upload karna hai.
Step 6: Blogger par theme upload karein.
Blogger ke dashboard me jaye aur “Theme” option par click kare. Theme settings me pahuchne ke baad, customization panel ke upar “Customize” button par click kare. Isse aap theme customization options tak pahuch jayenge.
Customization panel me, upar ke right corner me “Backup/Restore” ka option hoga. Uspar click kare. Ab ek dialog box open hoga, jisme aapko “Choose File” ya “Select File” button dikhenge. Is button par click karke aapne XML file ko select kare, jo aapne template download karne ke baad extract ki thi.
XML file select karne ke baad, “Upload” button par click kare. Blogger aapke XML file ko upload karega aur aapki website par new template apply ho jayegi.
Step 7: Theme customize karein.
Template upload hone ke baad, aap customization options ka upyog karke apne blog ke look aur feel ko further customize kar sakte hain. Colors, fonts, layout, aur other settings ko modify karke apne blog ko personal touch de sakte hain.
Step 8: Changes save karein.
Jab aap customization complete kar lein aur satisfied ho jayein, tab “Apply to Blog” ya “Save” button par click karke changes ko save karein.
Antim Vichar
Blogger theme upload karna bahut aasan hai. Aapko sirf Blogger dashboard me jaana hai, theme settings me jana hai, backup/restore option par click karna hai, apne theme file ko select karna hai, aur upload button par click karna hai. Isse aap apne Blogger blog ke liye new theme ko upload kar sakte hain aur apne blog ka look aur feel modify kar sakte hain. Dhyan rakhein ki theme upload karne se pehle backup lena accha hai, taaki aapke paas purane theme ka backup available rahe.


Thanks Bhai. This is pretty useful
Welcome Bro. I hope you find many useful post in this blog